In the spring of 2020, we built a vegetable garden in our backyard. I created this post with step-by-step instructions in the hopes that it helps you think through the process of creating your own kitchen garden.

Please let me know in the comments if you have any questions. Visit our youtube channel for a full step-by-step video.

Steps for building a vegetable garden
Instructions
- Choose the right spot for the garden.
- Finalize dimensions.
- Sketch a plan.
- Choose materials.
- Fencing.
- DIY or contractor?
- Clear land.
- Install fence posts.
- Build raised beds.
- Add soil to raised beds.
- Walkway.
- Fence the garden.
- Enrich the soil.
- Create a planting plan.
- Planting.
- Create markers.
- Upkeep and maintenance.
- Harvest.
- End of season maintenance.
Steps for building a vegetable garden
- Choose the right spot for the garden.
- Finalize dimensions
- Sketch a plan
- Choose materials
- To fence or not to fence?
- DIY or contractor?
- Clear land
- Install fence posts
- Build raised beds
- Add soil to raised beds
- Make a Walkway
- Fence the garden
- Enrich the soil
- Create a planting plan
- Plant
- Create markers
- Upkeep and maintenance
- Harvest
- End of season maintenance
Let’s look at each of these steps in detail.
Step 1: Choosing the right spot for the vegetable garden.
Consider sunlight and water access while making this decision. The land next to our deck is pretty flat and is perfect for growing vegetables. It is south facing, and gets plenty of sunlight during the day. Also, we already have a water outlet close to that spot. So this spot was a natural choice.
Step 2: Finalizing the dimensions.
This was going to be a one-time project so we decided to build the biggest garden we could fit on level land instead of starting small and expanding later. Our plan allowed for 25 feet x 15 feet. If using lumber for raised beds and fence, consider making the dimensions into multiples of standard lumber lengths to minimize wastage.
Step 3: Sketching the design of the kitchen garden.
We sketched the design with pencil on a piece of paper and then translated it into a digital version so I could share it with you. I wanted raised beds along the periphery of the garden and a couple of larger beds in the middle. The walkways are about two and a half feet wide. The width of the beds is also two and a half feet so that allows for easy access to the edges and corners without having to strain your back or to step into the beds and compacting the soil.

Step 4: Choosing the material for the beds and the fence.
We wanted our beds to last long but also look good. Here are a few options we considered.
- Pressure-treated wood
- Natural pest-resistant wood like cedar and walnut.
- Cinder blocks
Natural wood was very expensive and cinder blocks didn’t appeal to us aesthetically so we decided to go with pressure-treated wood.
Our beds are 10” tall.
Step 5: Fencing your kitchen garden
Our property borders a state park and we often see a lot of wildlife in the yard. Playful families of deer, foxes, beavers, rabbits, and squirrels are a common sight. Having had tons of flowering plants annihilated by deer, we were determined to keep these adorable annoying critters out of the garden. We decided to get galvanized steel fencing for deer, rabbits and squirrels.
Step 6: DIY or Contracting
We decided to hire a contractor for the project instead of doing it on our own. But if you are handy and have a partner who is handy, it is totally doable. It took the guys 4 days to complete the project so if you are doing it yourselves, it is doable over 2-3 weekends. But do remember that you can either save time or save money but not both. If choosing to hire a contractor, get quotes from several contractors. Scope out your project first. The total cost of the project should be around twice the cost of the materials.
Step 7: Clearing the land
We were offered an option to use weed killer to kill the grass but instead chose to have the grass dug out to make it environmentally safe. It took two men about half a day to dig through the grass.
Step 8: Fence posts
We used 4×4 posts that needed to be 8 feet above the ground for deer. The depth of the hole was about 3 feet. The posts were set in ground with quick setting concrete. We needed 12 posts. Each dot in this picture represents a post. Each post needed about a bag of quick setting concrete.

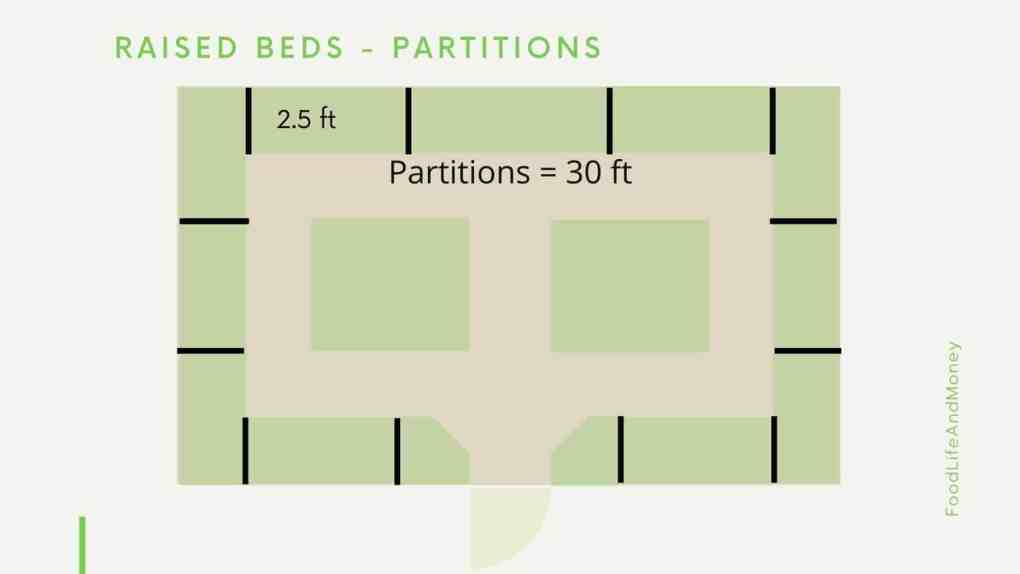
Step 9: Raised beds
This is how you would calculate the total length of beds needed. Calculate the outer perimeter. Calculate the inner perimeter. Calculate perimeter of any boxes inside the perimeter. Then calculate the total length of the partitions. Sum all the lengths together to get the total length. We used 2x10s to create 10-inch tall beds. For the beds, we needed about 212 feet of 2x10s. If you use 2x4s and want 12-inch tall beds, you will triple the total length you just calculated. You can certainly make the beds taller but please note that the taller your beds are, the more you are going to spend on soil. 10 inch-beds have worked great for us so far.


Step 10: Soil
We chose a mix of compost and topsoil. We calculated the area of the beds and multiplied it by the height of the beds (0.83 ft) to get the volume of soil we were going to need in cubic feet. Dividing that amount by 27 gave us the volume in cubic yards. The total came out to about 7 cubic yards. We would need about 8 to allow for the soil to settle and fill our other containers and pots.

Step 11: The walkway
The path in the garden was covered with landscape fabric before being covered with pea gravel. We calculated the area of the walkway and multiplied it by 1/4th feet to get the volume in cubic feet.

Step 12: Fencing the garden
Our garden was fenced with 2x4s and galvanized steel deer fencing. Calculate the perimeter of the garden and double it. Add the lengths needed for the door frame as shown in the picture. We used approximately 180 ft of 2x4s for the frame of the fence and the gate. For deer, we needed 80 feet x 8 feet of galvanized steel fencing. The lower periphery of the garden was additionally fenced using 80 feet of tighter poultry fencing to keep rabbits and squirrels out.


List of Materials

Step 13: Enriching the soil
This was our first year growing in our new garden and the soil was already nutrient- rich. For subsequent years, I plan to mix compost from our compost bin into the soil before planting. This year, I applied a natural seaweed fertilizer to the soil before planting and once again three weeks after planting. You can also use bone meal for soil enrichment.
Step 14: Creating a planting plan for your vegetable garden
Here’s what we did this year. I will try to update this every planting season. The corners of the garden are less accessible than the rest of the garden. We planted some flowers and blueberries in the corners. A planting plan will help you stay organized. For example, beans, cucumbers grow on vines so those will be vertical. You can plant herbs under them. Also, beans will help enrich the soil.
Step 15: Planting
It was a lot of fun planting seedlings in the garden with the whole family. I had started some seeds indoors in mid March so they were ready to go in the soil around Memorial Day weekend. It was a fun family affair. My daughter had a blast planting seeds. If you are new to gardening, here are some easy vegetables that you can start with.
Step 16: Markers
Markers help you stay organized. When you plant seeds or tiny seedlings, it is not easy to differentiate one plant from another. Markers help you keep track of what was planted. We painted some rocks from the yard into these cute fun markers for the garden. They’ve been painted with acrylic paint and sealed with a sealant. I’ll keep you posted on how they last through this year. You can also use paint stirrers or craft sticks as markers.

Step 17: Upkeep and maintenance of the vegetable garden
July was very hot this year so we had to water the garden almost every day when it didn’t rain. We spent about an hour everyday in the garden, weeding or watering and taking care of pests. The most annoying bugs were white flies and Mexican bean beetles. Spraying a little soap water took care of most of them. The beetles had to be hand picked and dropped into soap water. I have also used insect soap and neem oil at times. Plan to spend at least 15 minutes in your garden each day. It helps to spot pests sooner rather than later.
Step 18: Harvesting your vegetable garden
Here’s a list of the vegetables we planted
Tomatoes, cucumbers, hot green chilies, pumpkin, sweet peppers, carrots, okra, beets, varieties of lettuce, peas, herbs, squashes, zucchini, long beans, cluster beans, red cow beans, bitter gourd and eggplant.
If you are new to gardening, here are our top picks for first-time gardeners. Your vegetable garden is your own experiment. Some plants will succeed, others will fail but keep trying different combinations.
We harvested everything except peppers, and eggplant. For some reason peppers didn’t grow. We are just starting to see baby eggplants in early September. Our cucumbers got attacked by Mexican bean beetles but not before we harvested about 20 or so cucumbers.
This was a fun project for us. My daughter used to be a very picky eater but loves eating vegetables she grows. Gardening was a great way to spend quality time with the family, especially in this pandemic. Here are two easy recipes you can try with the produce – Easy mozzarella basil pizza and delicious cucumber cake.
Please check out our video on our channel and please don’t forget to subscribe to our channel for updates if you haven’t already. Stay safe and be well!